Milwaukee Hole Dozer saws cut fast through wood, metal, and plastic with tough bi-metal teeth. Many DIY builders and contractors rely on this tool for clean, round holes. A clear method helps every user drill accurate openings without wasted time or damaged materials.
This guide shows simple steps that help beginners and pros use a Milwaukee Hole Dozer correctly. Each step explains setup, drilling control, and safe pressure for smooth cutting results. Solid preparation keeps teeth sharp and extends tool life during heavy jobs.
Proper speed and steady pressure guide the saw through material without rough edges or stalls. Clear tips also help prevent tooth damage and protect the drill motor from overload. Careful technique produces smoother holes for pipes, wiring paths, locks, and hardware installations.
Master these basics and every Milwaukee Hole Dozer project becomes faster, cleaner, and more precise. Strong habits save blades, reduce effort, and deliver professional results.
How to Use Milwaukee Hole Dozer?
Large round holes appear in many repair and building jobs. Door hardware needs them. Pipes and electrical boxes need them. Standard drill bits cannot cut wide circles. A hole saw solves that problem.
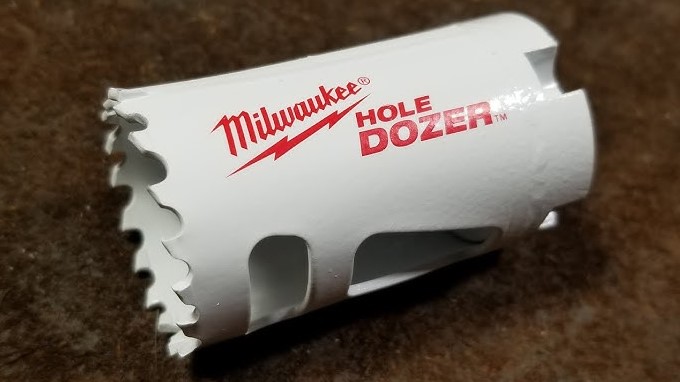
The Milwaukee Hole Dozer serves as a heavy-duty hole saw used by contractors and DIY users. The tool cuts clean round holes through wood, drywall, plastic, and thin metal. Strong steel construction and sharp teeth allow fast cutting with less effort.
Many beginners install the tool on a drill but feel unsure about the correct process. Wrong drill speed, poor alignment, or too much pressure can damage the teeth and ruin the hole.
Clear steps make the work easier. Good setup helps the saw cut smoothly and last longer. This guide explains the tool in detail. Each step shows how to prepare, cut, and maintain the hole saw for reliable results.
Understanding the Milwaukee Hole Dozer
A hole saw works like a circular cutter. The teeth cut the outer edge of a hole while the center remains solid until the cut finishes.
The Milwaukee Hole Dozer has a deep steel cup and aggressive cutting teeth. That design allows deeper holes and faster cutting compared with basic hole saws.
Typical Hole Sizes
Hole saws come in many diameters. Common sizes include:
-
3/4 inch
-
1 inch
-
1-1/2 inch
-
2 inch
-
3 inch
-
4 inch or larger
Each size creates a hole with the same diameter as the saw.
Electricians often use 2-1/8 inch saws for electrical boxes. Plumbers may use 1-1/2 inch or 2-1/2 inch saws for pipe openings.
Key Features of the Tool
Design details help the hole saw work faster and last longer.
Thick Steel Construction
The body uses thick hardened steel. This structure resists bending under pressure. Thin hole saws can warp during cutting. Thick steel keeps the tool stable.
Aggressive Tooth Pattern
Teeth sit in an alternating pattern. Each tooth cuts a small section of material. This pattern reduces vibration and improves chip removal. Sharp teeth reduce heat and help the drill run smoother.
Deep Cutting Cup
The cutting cup depth often reaches about 1.6 inches. This depth allows drilling through thick wood boards without stopping halfway. Shallow hole saws require flipping the material to finish the cut. Deep cups reduce that problem.
Large Side Slots
Large openings appear on the side of the cup. These slots serve two purposes.
-
Help remove wood plugs quickly
-
Allow airflow during cutting
Airflow helps reduce heat buildup.
Materials the Hole Dozer Can Cut
Different materials require different drill speeds and pressure levels. Common materials include:
Wood
Softwood and hardwood cut easily. Pine, plywood, oak, and MDF work well with the hole saw.
Drywall
Drywall cuts very fast. Low pressure prevents tearing the paper surface.
Plastic
PVC pipes, plastic panels, and acrylic sheets can be cut. Slow speed prevents melting.
Thin Metal
Sheet metal, aluminum, and thin steel panels can also be drilled. Slow speed and cutting oil improve results. Material thickness affects drilling time. Soft materials cut in seconds. Hard metals require patience and slow drilling.
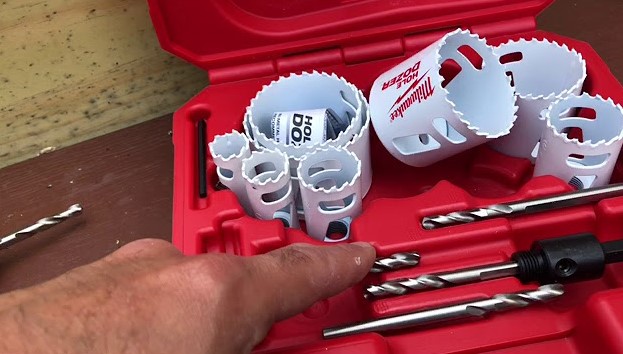
Tools Required Before Starting
Proper tools help complete the job smoothly.
Basic equipment includes:
-
Power drill with adjustable speed
-
Milwaukee Hole Dozer hole saw
-
Arbor with pilot drill bit
-
Measuring tape
-
Marker or pencil
-
Safety glasses
-
Work gloves
-
Clamp or vise
-
Scrap wood for support
Preparation saves time later.
Step-by-Step Guide to Using a Milwaukee Hole Dozer
Careful setup and steady drilling produce clean holes.
Step 1: Measure and Mark the Center
Measure the location of the hole carefully. Place a clear mark at the center point. A small cross mark helps guide the pilot bit.
Accuracy at this stage determines the final hole position. Double check the measurements before drilling.
Step 2: Assemble the Hole Saw and Arbor
Attach the hole saw cup to the arbor. Turn the saw clockwise until it sits tight against the arbor base.
Check the pilot drill bit in the center. The bit should extend slightly beyond the saw teeth. This extension helps the bit start the hole first. Loose parts create vibration and uneven cutting.
Step 3: Install the Arbor into the Drill
Insert the arbor shaft into the drill chuck. Tighten the chuck firmly with the drill key or hand grip.
Spin the drill briefly at low speed. This short test confirms proper alignment. Stable setup leads to smoother drilling.
Step 4: Secure the Work Surface
Loose materials can move during drilling. Clamp the board or panel to a workbench. Strong support keeps the drill steady.
A scrap wood board under the material helps prevent tear-out when the saw exits the bottom. Clean edges matter.
Step 5: Drill the Pilot Hole
Place the pilot bit on the center mark. Hold the drill straight and level. Start the drill slowly. The pilot bit should enter the surface first.
This small hole guides the hole saw and prevents slipping. Steady hands help maintain control.
Step 6: Start the Circular Cut
The saw teeth touch the surface after the pilot hole forms. Run the drill at medium speed for wood. Use slower speed for metal. Apply gentle forward pressure.
Teeth begin cutting a circular groove around the pilot hole. Wood chips or metal shavings will appear during cutting. Short pauses help remove debris.
Step 7: Continue Cutting Through the Material
Maintain steady pressure while drilling. Allow the teeth to do the cutting work. Excess pressure can stall the drill.
The saw slowly moves deeper into the material. Heat may build during long cuts. Brief pauses help cool the teeth. Lubricating oil helps when drilling metal.
Step 8: Complete the Hole
The saw eventually breaks through the bottom surface. Release the drill trigger immediately.
Pull the drill out slowly while the saw stops spinning. A clean circular hole should remain in the material. Good alignment creates smooth edges.
Removing the Wood Plug
A solid piece of wood usually remains inside the saw.
Removal takes only a few steps.
-
Remove the hole saw from the drill.
-
Insert a screwdriver into the side slots.
-
Push the wood plug out from the inside.
Large side slots make this process faster. Metal holes rarely create large plugs. Chips usually fall away during drilling.
Drill Speed Guidelines
Correct drill speed protects the teeth and improves cutting.
General speed recommendations:
| Material | Recommended Speed |
|---|---|
| Soft wood | 900–1500 RPM |
| Hardwood | 500–1000 RPM |
| Plastic | 300–800 RPM |
| Thin metal | 150–300 RPM |
High speed creates heat and dull teeth faster. Slow and controlled drilling produces better holes.
Pressure Control During Drilling
Pressure plays a major role in cutting quality.
Too much pressure causes:
-
Tooth damage
-
Drill motor strain
-
Rough edges
Too little pressure slows the cut. Balanced pressure allows teeth to remove material evenly. Let the tool work naturally.
Common Applications
Professionals use the Milwaukee Hole Dozer in many industries.
Electrical Work
Electricians drill holes for:
-
Switch boxes
-
Recessed lights
-
Cable routes
Large hole sizes help install electrical fixtures quickly.
Plumbing Jobs
Plumbers create openings for pipes in wood framing or cabinets. Precise holes help pipes fit tightly.
Door Hardware Installation
Door lock sets often require a 2-1/8 inch hole. Hole saws create the exact diameter needed.
HVAC Installation
Technicians cut holes for ventilation ducts or pipe sleeves. Hole saws handle drywall and sheet metal used in duct systems.
Maintenance and Care
Regular maintenance keeps the hole saw sharp and reliable.
Clean the Tool After Each Job
Remove sawdust, plastic chips, or metal debris. Dust buildup can block the teeth. Clean tools cut better.
Inspect the Teeth
Check for worn or chipped teeth. Dull teeth increase cutting time and create rough holes. Replace the saw if teeth appear damaged.
Store in a Dry Place
Moisture causes rust on steel tools. Tool boxes or dry shelves work well for storage. Light oil coating can protect the metal surface.
Safety Tips
Power tools require careful handling.
Follow these safety practices:
-
Wear safety glasses during drilling
-
Keep hands away from the rotating saw
-
Secure materials before drilling
-
Stop the drill before adjusting the tool
-
Use gloves for better grip
Attention and patience prevent accidents.
FAQs
What drill power works best with a Milwaukee Hole Dozer?
A corded drill or a strong cordless drill works well. Drills with adjustable speed provide better control for different materials.
Why does the hole saw smoke during drilling?
Smoke usually appears when the drill runs too fast or pressure becomes too high. Slower speed and short pauses help reduce heat.
Can the hole saw cut thick metal?
The tool works best on thin metal sheets. Thick steel requires special metal cutting tools or industrial hole saws.
Why does the hole edge look rough?
Rough edges often appear when the drill tilts during cutting or speed becomes too high. Straight drilling improves edge quality.
How long does a Milwaukee Hole Dozer last?
Tool life depends on usage and material type. Proper speed, light pressure, and regular cleaning can extend the lifespan for many projects.
Conclusion
The Milwaukee Hole Dozer offers a reliable method for cutting large round holes in wood, plastic, drywall, and thin metal. Strong steel construction, sharp teeth, and deep cutting cups help the tool perform well in many construction and repair tasks.
areful setup, correct drill speed, and steady pressure allow the saw to cut smoothly and accurately. Simple maintenance and safe work habits help extend the life of the tool and maintain consistent results in future projects.